 |
| This is the fabulush egg from the James Bond film - Octopussy. I stated by creating a sphere and then using the scale tool, I namipulated it into an egg shape |
 |
| Then using the bector select tool I selected the top half of the egg and then rotated it on the edge of the egg, This cut e egg in half and gave me the basic form for the open and shut feature of the egg. |
 |
| Then Using the edge select tool and combining it with the exstude tool, I was able to not only create the platform on the bottom half of the egg into an almost sompletly shut off section, but I was also able to create a rim on the tock half of the egg, This ill hold the edges cloth fabric later in this build. |
 |
| Next I had to make the carage that will be siting on the egg platform. I created this in a different file then the egg in order to keep things simpler for myself. I stated by creating the wheals of the carage. To do this I used the torus tool to create a donut shape, I made sure that the outer ring was this and wide. This will be used for the wheal rim. |
 |
| Then to create the spocks of the wheal. I stated with a small sphere , then I added a cylindar to use as the strut. I then cloned and rotated the cylindars around the shere untill I created the star shap you can see. |
 |
| Then I placed the wheal rim over the spocks and resized it untill it fiterd, then I gouped them together and cloned the wheal four times |
 |
| I moved the wheals into there corisponding positions and created a cylindar front and rear axel between them, then i linked to to axels togeatehr with a cylindar and using the vector slect tool I pushed down the middle of the axel to cerate a dip for the carage. |
 |
| Now I had to create the carage. I stated with a simple box that fit within the wheal spane. |
 |
| Then I added another box, this time the botom half of the box was curved using a combination of the edge selection and rotation tools, when I had the soft selection on it gave me the desigerd affect of a curved bottom for the carage. |
 |
| The roof and windows of the carage are simply different sided rectangles. Luckly, becaouse of the size the carage is going to be I didn't have to add to much detail. However I did want to give the roof a beter look so I used the face selection tool, selected to top of it and then decrised its size with teh scale tool, this gave the roof a taperd edge look. |
 |
| Then I dad to give the carage wheal gards that streched the width of the carage. For this I used a thin rectangle and then using the vector select and a comination of the move and rotation tools I craeted a curved artch . ( Even though this is the final object that I finished, I did start its creation befor both of the other two objects. It was not untill later that I discoverd and learnt about the bend tool which would have made the hole process a lot easyer) I then cloned this and rotated it, then moved it to the otehr side of the carage |
 |
| The finished carage loks like this. I then grouped it all before saving it and reloading the egg I made earler. |
 |
| Using the murge file process I found in the main menu, I murged both the egg file and the carage file togeather into a new combind file. Then i rescaled the carage untill it could fit onto the egg platform. |
 |
| Now I had to decorate the egg. To do this I had to cerate interweaving golden bands that crosed over the eggs serface severeal times. I stated with a long this box with several polygons. |
 |
| I then applyed the bending tool (after I leant how) to the shape. This cerated an arch way, I then used the move tool to adjust one of the legs untill the overall shape of the arche resembled that of the egg's curve. |
 |
| Then using the vector select tool with the soft selection turned on, I selected serveral vectors and then rotated them, then I redused the number of vertors I selected untill I only hade the middel band selected, This gave the archway a S shaped appearance. |
 |
| I then cloned and rotated them around the middle point to create a criscrossing array of bands that resembes a flower. |
 |
| I then moved them and resized them around both the top and bottom half of the egg. |
 |
| Now I had to create the fabric that will go into the top half of the egg. I stated with a thin cylindar with several vectors on its faces. |
 |
| Then with the vetor select tool I moved the vectors to cascade in on themselves. |
 |
| I had to use a combination of both the soft select on and off inorder to achive the sesiard affect. I then place the cloth into the top half of the egg, resising it when nessasary inorder to achive the look I wanted. |
 |
| I now had to create dimonds for the egg that will be places within and around the golden bands. I stated by creating a sphere |
 |
| Then I used the scale tool to thin out the sphere untill it was almost the same shape as a button. |
 |
| Then using the vetor select tool with the move tool I made the dimonds bumpy. |
 |
| Then I cloned the dimond 80 times over inorder to get enough of them to go al the way around the egg. The real egg this this is bassed of of actualy has 360 of them but by now the file size of this egg was already quite high so I had to limit the number of them gust to still beable to manipulate the progrm at a resanable speen and even then it was still very jump and it took a very long time to get all the dimonds into the correct places. |
 |
| Finaly, next came the material ediror, to I applyed the colour and tectres of each of the objects to its own panale and then applyed them to the shapes. |
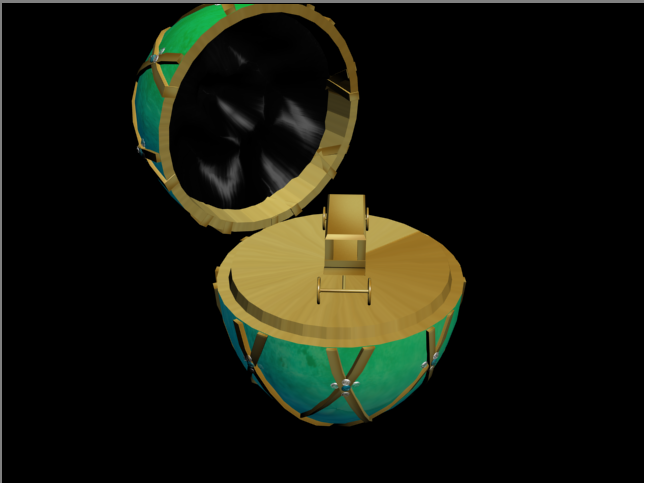 |
| This is the finished egg after the rendering and textures have been applyed. All it all the file size of this egg is just over 70mb. becasue of this I had to stop here rather then add the otehr details on that I wanted to, alhough lighting will almost sertinly be added when ity come to animating it. |
No comments:
Post a Comment