Tuesday, 8 March 2011
Animation for missile leanch, attept one
This is the first virsion of the missile launch for the animated trailar. The basic motion is almost complete. although the missile does need a flame comming out of it. as well as smock leaving the launcher.

First attept at animating golden egg for trailar
This is the first attept at animating an object for the trailar. it is simply the egg opening and then the camera rotating. All in all it looks quite good for my first go howver I think I will be modifying it several times in order to fit it into the trailar properly.
animation tutorial
This small animation was simply created with the auto key function.
Thursday, 3 March 2011
Research board - Octopussy

Wednesday, 2 March 2011
Golden Egg (Third trailar design)
 |
| This is the fabulush egg from the James Bond film - Octopussy. I stated by creating a sphere and then using the scale tool, I namipulated it into an egg shape |
 |
| Then using the bector select tool I selected the top half of the egg and then rotated it on the edge of the egg, This cut e egg in half and gave me the basic form for the open and shut feature of the egg. |
 |
| Then Using the edge select tool and combining it with the exstude tool, I was able to not only create the platform on the bottom half of the egg into an almost sompletly shut off section, but I was also able to create a rim on the tock half of the egg, This ill hold the edges cloth fabric later in this build. |
 |
| Next I had to make the carage that will be siting on the egg platform. I created this in a different file then the egg in order to keep things simpler for myself. I stated by creating the wheals of the carage. To do this I used the torus tool to create a donut shape, I made sure that the outer ring was this and wide. This will be used for the wheal rim. |
 |
| Then to create the spocks of the wheal. I stated with a small sphere , then I added a cylindar to use as the strut. I then cloned and rotated the cylindars around the shere untill I created the star shap you can see. |
 |
| Then I placed the wheal rim over the spocks and resized it untill it fiterd, then I gouped them together and cloned the wheal four times |
 |
| I moved the wheals into there corisponding positions and created a cylindar front and rear axel between them, then i linked to to axels togeatehr with a cylindar and using the vector slect tool I pushed down the middle of the axel to cerate a dip for the carage. |
 |
| Now I had to create the carage. I stated with a simple box that fit within the wheal spane. |
 |
| Then I added another box, this time the botom half of the box was curved using a combination of the edge selection and rotation tools, when I had the soft selection on it gave me the desigerd affect of a curved bottom for the carage. |
 |
| The roof and windows of the carage are simply different sided rectangles. Luckly, becaouse of the size the carage is going to be I didn't have to add to much detail. However I did want to give the roof a beter look so I used the face selection tool, selected to top of it and then decrised its size with teh scale tool, this gave the roof a taperd edge look. |
 |
| Then I dad to give the carage wheal gards that streched the width of the carage. For this I used a thin rectangle and then using the vector select and a comination of the move and rotation tools I craeted a curved artch . ( Even though this is the final object that I finished, I did start its creation befor both of the other two objects. It was not untill later that I discoverd and learnt about the bend tool which would have made the hole process a lot easyer) I then cloned this and rotated it, then moved it to the otehr side of the carage |
 |
| The finished carage loks like this. I then grouped it all before saving it and reloading the egg I made earler. |
 |
| Using the murge file process I found in the main menu, I murged both the egg file and the carage file togeather into a new combind file. Then i rescaled the carage untill it could fit onto the egg platform. |
 |
| Now I had to decorate the egg. To do this I had to cerate interweaving golden bands that crosed over the eggs serface severeal times. I stated with a long this box with several polygons. |
 |
| I then applyed the bending tool (after I leant how) to the shape. This cerated an arch way, I then used the move tool to adjust one of the legs untill the overall shape of the arche resembled that of the egg's curve. |
 |
| Then using the vector select tool with the soft selection turned on, I selected serveral vectors and then rotated them, then I redused the number of vertors I selected untill I only hade the middel band selected, This gave the archway a S shaped appearance. |
 |
| I then cloned and rotated them around the middle point to create a criscrossing array of bands that resembes a flower. |
 |
| I then moved them and resized them around both the top and bottom half of the egg. |
 |
| Now I had to create the fabric that will go into the top half of the egg. I stated with a thin cylindar with several vectors on its faces. |
 |
| Then with the vetor select tool I moved the vectors to cascade in on themselves. |
 |
| I had to use a combination of both the soft select on and off inorder to achive the sesiard affect. I then place the cloth into the top half of the egg, resising it when nessasary inorder to achive the look I wanted. |
 |
| I now had to create dimonds for the egg that will be places within and around the golden bands. I stated by creating a sphere |
 |
| Then I used the scale tool to thin out the sphere untill it was almost the same shape as a button. |
 |
| Then using the vetor select tool with the move tool I made the dimonds bumpy. |
 |
| Then I cloned the dimond 80 times over inorder to get enough of them to go al the way around the egg. The real egg this this is bassed of of actualy has 360 of them but by now the file size of this egg was already quite high so I had to limit the number of them gust to still beable to manipulate the progrm at a resanable speen and even then it was still very jump and it took a very long time to get all the dimonds into the correct places. |
 |
| Finaly, next came the material ediror, to I applyed the colour and tectres of each of the objects to its own panale and then applyed them to the shapes. |
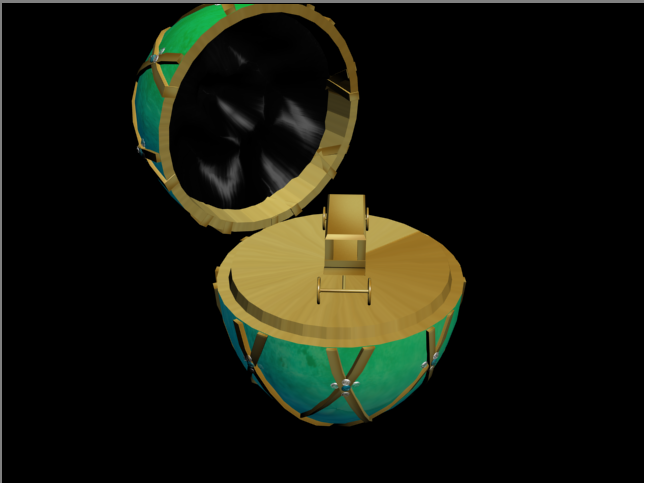 |
| This is the finished egg after the rendering and textures have been applyed. All it all the file size of this egg is just over 70mb. becasue of this I had to stop here rather then add the otehr details on that I wanted to, alhough lighting will almost sertinly be added when ity come to animating it. |
rocket and fire platform (second trailar object)
 |
| This is the second object for the trailer. It s a rocket or missile that is launched to try and shoot down James Bond while he is piloting the mini plane (first object). I wanted to start with the firing platform for the rocket. I stated with a thin basic square that was created using the box tool. |
 |
| Then I used the vector select tool along with the move tool to bend the top edge of the box into a curve. In order to get the curve I had to create more vectors to manipulate rather then just the four points i currently had. To do this I once again used the edge select and ring tools, then applied the connect tool to them. I repeated this until I had enough vectors to create a realistic curve to the top of the box. |
 |
| Then I cloned the box and used the rotation and move tools to position the new copy of the box into place, this section of the launcher will provide the angle of elevation for the missile on launch. |
 |
| Next came the missile housing. This is the part of the fire platform that will hold the missile in place until it is fired. It was created using the box tool, then I manipulated it into place with the rotation and move tools. |
 |
| Then once again I used the vector and move tools to manipulat the box into the shape I needed and I used the same technique as I did befor to create the evtra vectors I needed to ahcive this. |
 |
| Now I selected all three of the shapes I created so far and cloned them all, then I applied a mirror to them, this reflected them all so I now had the new shapes facing the ofther direction, then using the move tool i draged the shapes intoplace to create the hole lancher that you can see in the image. |
 |
| Now came the holding rings. These rings are attched to the bottom of the housing and hold the missile in place untill it is fired. These rings are simply made out of thin, small tubes. I needed two of them in all. |
 |
| The rings where manipulated into place using the move and rotation tools. |
 |
| It was time to create the rocket. I stated by creating a ling thin cylinder. slightly longer then the rocket housing but slightly thiner then the iner layer of the rings. alowing it to slide into them. |
 |
| Using vector select and the move tool, I created a tip for the rocket. I had to incress the width of the second row of vectors using the scale tool. |
 |
| Using the move and rotation tools I placed the rocket into the holding rings |
 |
| Then using the vector select tool with soft selections turned on, I created an exorst for the rocket |
 |
| Now for the fins. This missile needs three fins at the front of it to help stabalise and guide it during flight. I state with a thin small rectangle. |
 |
| Then using the vetor select and move tools, I crafted the rectangle into the shape I needd for the fins. |
 |
| Then I cloned the fin and manipulated it into place using the rotation and move tools to create the second one. |
 |
| For the third fin, I once again used the clone tool nad then applyed a mirror. this fliped the fin exactly into the rotation I needed, then I simply moved it across onto the other side of the missile. |
 |
| Finally I material texture and colour of the rocket and firing platform to there assigned shapes. making it look more realistic. |
 |
| This is the rocket and fire platform after colour and rendering. has been applied. |
Monday, 28 February 2011
mini jet plane (First trailar object)
This is the mini jet plane used in the James Bond film - Octopussy. After searching the Internet to no avail, a class mate was kind enough to shear with the blueprints to the slightly newer version of the jet. Although this was not the same on used in the film, the only difference between the look of this new on the the film version is the fold up wings are not presents in this design. Therefore I decided to use these designs for the object that will be used in my trailer.

 |
| Using the same techniques I was tort in the tank tutorial, I placed the diagrams to two bisecting planes to be used as a template for the object. I decided that creating the object on one side of the diagram and then using the similarity tool to mirror it onto the other side was the easies way to create this symmetrical object. The canopy for the plane was actually created with a cube tool. Then using the vector select and move tools, I bent the points of the box into the correct shape. in order to get the angles right I needed to create more vector points so I used a combination of the edge select, ring select and connect tools in order to create the amount of vectors i needed. Then to give the box the streamline curves of a jet plane, I applied a turbo smooth effect to the box. Then all that was left was to apply a similarity affect to the box, adjust the mirror to get the affect in the correct place and the main canopy for the plane was completed. |
 |
| Next was the wings. Again i used a rectangle to create the basic shape and then manipulate the vectors into shape. This time however I was unable to use the turbo smooth tool as it made the wings to circular, so I turned once again to the combination of the edge select, ring select and connect tools in order to create a third edge, then in increased the scale of the edge slightly, and it give the impression of a curved wing. |
 |
| Once again I used the similarity tool and adjusted the position of the mirror in order to reflect the wing onto the other side of the object. |
 |
| I used the exact same process in order to create the back tail fins. |
 |
| Next came the engines, i created the basic shape using two cylinders on top of each other to create the twin back jets. Then I added to donuts onto the end to create the jet nasals. |
 |
| The thruster was simply a tube added on top with one end tapered into the jet itself to give the impression that it is coming out of the canopy. |
 |
| Then I used the same techniques that I used for the wings and the back fins to create the top rear fin out of a rectangle. |
 |
| The wheels where a bit more tricky. The basic tier is made out of a thin cylinder with a donut around it. then using the vector select and move tools i created a thinner tier by extruding the outer vectors of the donut, this actually took a lot longer then I anticipated to get the look right. |
 |
| The front wheal housing was created by using three rectangles and one box in order to give the impression that the wheal can be tuned. The rectangles had to be curved in the same way as the wings. Giving them a more stream line look. The wheal was then attached to the aircraft by a cylinder strut. |
 |
| The rear wheals are exactly the same however as they don't need to turn, they where created with out the extra bent arm. Once again a similarity tool was applied to the wheal and was maneuvered into place on the other side of the plane. |
 |
| In order to create the cockpit, I had to use the cut tool combined with vector select. Using the diagram as i guide I was able to cut out and group a section of the canopy to use as the rear cockpit window. |
 |
| I was able to use the same technique again in order to select and group together a section of the canopy for the front cockpit window as well. |
 |
| This is the jet after the cut out cockpit has had a glass affect added to it and the see-though object property turned off. , allowing you to see right though the windows. |
 |
| After the patten was also cut out of the canopy for the colour patten of the plane, the colours for the plane where added to separate material panels. The colours used for the plane are red, white and blue. |
 |
| This is the jet after the colour has been added. (still in the design view) |
 |
| This is the finished jet after rendering. It looks the part but the refection of the windows is a little to much. |
Subscribe to:
Posts (Atom)